Make your React apps fast again
How to Reduce React App Loading Time By 73.5%


Customer satisfaction, employee productivity, business agility, and profitability are all directly affected by the performance of web apps we create. However, since React inception complexity of our apps has grown tremendously. The number of tools, libraries, configurations, and dependencies required to create a new app has grown exponentially, and it all lays a heavy burden on productivity of our apps.
And, yes, React as a whole is fantastic, it employs a number of techniques to minimize the amount of costly DOM operations required to update the UI of our apps. But according to Akamai research, 1 second delay in load time can result in a 7% decrease in conversions, making it critical for developers to create apps with optimal performance.
In this article we will go over ways to improve the performance of a React application, including some pre-optimization techniques.
Profiling your React app and searching for bottlenecks
I believe that optimizing without measuring is almost always premature, which is why I would recommend benchmarking and measuring performance first. You can use Chrome Timeline and React Dev tools to profile and visualize components. This allows you to see which components are unmounted, mounted, and updated, as well as how long they take in relation to one another. It will assist you in getting started on your performance optimization journey.
Understanding how React updates its UI
When we create new component, React creates a virtual DOM for its element tree in the component. When the component's state changes, React recreates the virtual DOM tree and compares the result to the previous render. It only then updates the changed element in the DOM, this is known as diffing.
Because the actual DOM is expensive to manipulate, React employs the concept of a virtual DOM to reduce the performance cost of re-rendering a webpage. This is beneficial because it reduces the time it takes for the UI to render. However, if not properly managed, this concept can slow down a complex app.
What we can conclude from this is that changing the state of a React component causes it to re-render. Similarly, when the state is passed down as a prop to a child component, it re-renders the child and so on, which is fine because React must update the UI.
The problem arises when the child components are not affected by the state change. In other words, they not received prop from the parent component. Nonetheless, React re-renders these child components. So, as long as the parent component re-renders, all of its child components re-render, whether or not a prop passes to them, this is React default behavior. So basically when the App component's state changes, the child component re-renders, even if it is not directly affected by the state change.
This re-rendering should not cause performance issues in most cases, and we should not notice any lag in our application. On the other hand if component performs an expensive computation and we notice performance issues, we should optimize our React application.
Measuring performance with React DevTools
We can use the Profiler in the React DevTools to measure the performance of our apps. Every time our application renders, we can collect performance data.
The profiler logs how long it takes a component to render, why it is rendering, and other information. We can then investigate the affected component and perform the necessary optimization. To use the profiler, you must first install the React DevTools for you preferred browser.
Profiling the application reveals the following behavior:
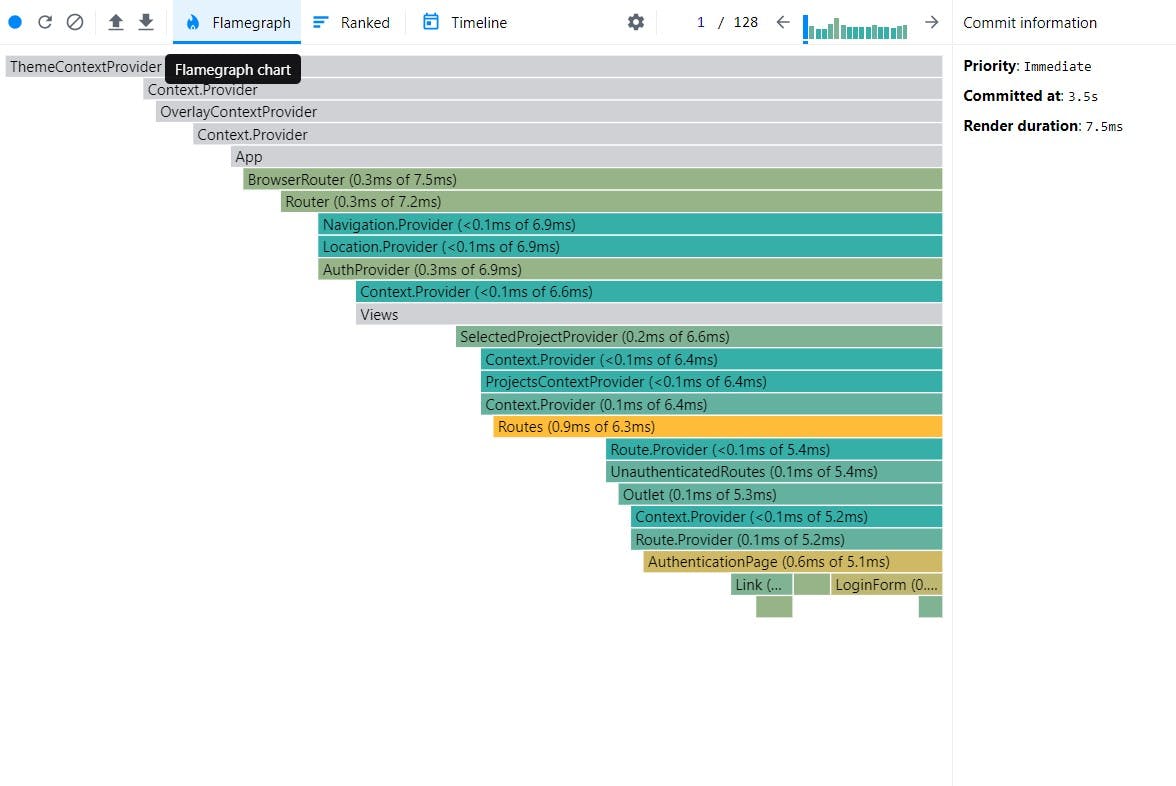
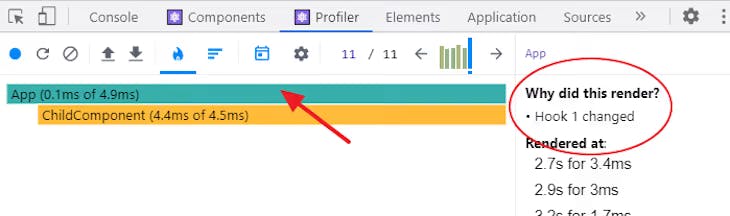
When the input text field updates we receive details from the rendered components, the DevTools profiler highlights every rendered component. We can see how long it took to render the components and why the App component is rendering in the flame chart below.
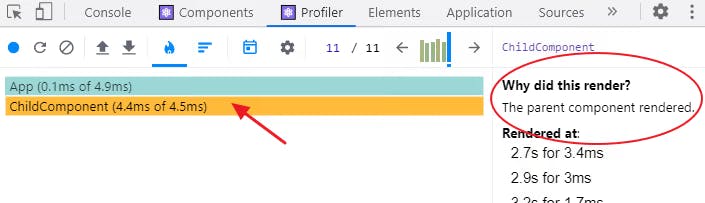
Similarly, the image below shows the child component rendering as a result of the parent component rendering.
If we have an operation in a child component that takes time to compute, this can have an effect on the performance of the React app. So now when you understand how to profile your React app and search for blocking components and bottlenecks in your components back to our optimization methods.
React performance optimization techniques
1. Keeping component state local where necessary
State updates occur frequently in large and complex applications. Some are asynchronous, such as background HTTP calls, while others occur by user or You, and components are frequently rendered multiple times before any user interaction occurs. It is the developers responsibility to detect wasted renders and avoid reconciliation where no rerender needed. This is particularly troublesome if the wasted renders occur in parent components and React redraws all the components in the tree and wastes CPU cycles.
So, to ensure that re-rendering a component only occurs when necessary, we can extract the code that responsible for component state and make it local to that part of code. This guarantees that only the component concerned with the state renders.
But sometimes, we cannot avoid having a state in a global component while passing it down to child components as a prop. In this case, let’s learn how to avoid re-rendering the unaffected child components.
2. Memoizing React components to prevent unnecessary re-renders
Memoization is a technique used to speed up your code by caching the results of expensive function calls and returning the cached result when the same inputs are used again. A memoized function is usually faster because if it is called with the same values as the previous one, it will fetch the result from cache instead of executing function logic.
Consider the following simple stateless UserDetails React component. When the props change, this stateless component will re-render. If the UserDetails component attribute is less likely to change, then it's a good candidate for using the memoize version of the component.
import memo from 'memo';

const UserDetails = ({user, onEdit}) =>{
    const {title, full_name, profile_img} = user;

    return (
        <div className="user-detail-wrapper">
            <img src={profile_img} />
            <h4>{full_name}</h4>
            <p>{title}</p>
        </div>
    )
}

export default memo(UserDetails,{
    isReact: true
});
Using React.memo()
React.memo is a higher-order component that is used to wrap a purely functional component to avoid re-rendering if the props received in that component never change:
import React, { useState } from "react";

// ...

const ChildComponent = React.memo(function ChildComponent({ count }) {
  console.log("child component is rendering");
  return (
    <div>
      <h2>This is a child component.</h2>
      <h4>Count: {count}</h4>
    </div>
  );
});
When we pass down primitive values, such as a number in our example, React.memo() performs well. But non-primitive values, such as arrays and functions, on the other hand, always return false between re-renders because they point to different memory spaces. The memoized component always re-renders when we pass down an object, array, or function as a prop. To prevent the function from always redefining, we will use a useCallback Hook that returns a memoized version of the callback between renders.
Using the useCallback Hook
With the useCallback Hook, the incrementCount function only redefines when the count dependency array changes:
const incrementCount = React.useCallback(() => setCount(count + 1), [count]);
Using the useMemo Hook
UseMemo is a hook that memoizes the return value of a function. It accepts two arguments: one is a function that returns the value to be memoized, and the other is a dependency array. The hook checks for changes in the values passed into this dependency array. If a dependency change is detected, the function passed in as the first argument is executed once more. If no change occurs, the useMemo hook returns the memoized value stored in a previous invocation.
Let’s see how to apply the useMemo Hook to improve a React app’s performance. Take a look at the following code that we’ve intentionally delayed to be very slow.
import React, { useState } from "react";

const expensiveFunction = (count) => {
  // artificial delay (expensive computation)
  for (let i = 0; i < 1000000000; i++) {}
  return count * 3;
};

export default function App() {
  // ...
  const myCount = expensiveFunction(count);
  return (
    <div>
      {/* ... */}
      <h3>Count x 3: {myCount}</h3>
      <hr />
      <ChildComponent count={count} onClick={incrementCount} />
    </div>
  );
}

const ChildComponent = React.memo(function ChildComponent({ count, onClick }) {
  // ...
});
And initialize it in our code:
const myCount = React.useMemo(() => {
  return expensiveFunction(count);
}, [count]);
The expensiveFunction should only be called when the count button is clicked, not when we type in the input field. We can memoize the returned value of the expensiveFunction using the useMemo Hook so that it only re-computes the function only when needed, i.e., when the count button is clicked.
You can read more about it here
3. Code-splitting in React using dynamic import()
The size of the JavaScript bundle is a major contributor to the slower load times of rich client-side applications. By default, webpack puts everything in one bundle. So browser always downloads all of the code, including rarely used routes, configuration popups, and other stuff just in case. Heavy libraries will also be present, even if only stuff you need is "about us" page.
Code splitting is the most effective way to combat it. You'll have to asynchronously lazy load parts of your code and use them only when they're needed. Suspense and React.lazy can assist you with this, and react-router also supports lazy routes.
When it comes to pure client-side apps, lazy loading is quite simple, but things get complicated when it comes to server-side rendering. Because you only have one chance to render the page, asynchronous code will not work. Everything that is lazy-loaded on the client must be ready for rendering on the server ahead of time. Both React.lazy and Suspense are not available for server-side rendering.
React code-splitting allows us to split a large bundle file into multiple chunks using dynamic import(), then lazy load these chunks on-demand using React.lazy. This approach improves the page performance of a complex React application significantly. To implement code-splitting, we modify a standard React import as follows:
const Home = React.lazy(() => import("./components/Home"));
const About = React.lazy(() => import("./components/About"));
This syntax instructs React to dynamically load each component. As a result, when a user clicks on a link to the home page, React only downloads the file for the requested page rather than loading a large bundle file for the entire application.
Following the import, we must render the lazy components within a Suspense component as follows:
<React.Suspense fallback={<p>Loading page...</p>}>
  <Route path="/" exact>
    <Home />
  </Route>
  <Route path="/about">
    <About />
  </Route>
</React.Suspense>
The Suspense allows us to display a loading text or indicator as a fallback while React waits to render the lazy component in the UI.
You can read more about it here.
4. Virtualize Long Lists
List virtualization, also known as windowing, is a method of improving performance when rendering a long list of data. This technique renders only a subset of rows at a time and can significantly reduce the time it takes to re-render the components as well as the number of DOM nodes created.
Popular React libraries include react-window and react-virtualized, which provide reusable components for displaying lists, grids, and tabular data.
References and Related Articles: Virtualize Long Lists, react-window, react-virtualized
5. Lazy loading images in React
To improve the page load time of an application that got lots of images, we can avoid rendering all of them at once. We can use lazy loading to delay rendering images in the DOM until they are about to appear in the viewport.
Lazy loading images, like windowing, prevents the creation of unnecessary DOM nodes, thereby improving the performance of our React application.
Popular lazy loading libraries for React projects include react-lazyload and react-lazy-load-image-component. And you can use it like this:
import React from 'react';
import { LazyLoadImage } from 'react-lazy-load-image-component';

const MyImage = ({ image }) => (
  <div>
    <LazyLoadImage
      alt={image.alt}
      height={image.height}
      src={image.src} // use normal <img> attributes as props
      width={image.width} />
    <span>{image.caption}</span>
  </div>
);

export default MyImage;
Further reading: How to Lazy Load Images in React
6. Multiple Chunk Files
Every application starts with a few components. You begin by adding new features and dependencies, and before you know it, you have a massive production file.
You can think about having separate files by using the 'SplitChunksPlugin' for webpack. By splitting your files, your browser caches them less frequently and downloads resources in parallel to reduce load time wait.
One issue that this plugin addresses is code duplication, which can result in redundant content being loaded over the network. The SplitChunkPlugin can determine, based on some configuration, which modules are too expensive to duplicate and then put them in separate chunks so that the significant effort of loading large modules is done only once.
Non React specific optimizations
1. Serve Everything From a CDN
It may seem obvious, but you should be using a Content Delivery Network (CDN). It serves your assets from a location closer to the user, resulting in higher bandwidth and lower latencies. They are designed for speed and are typically inexpensive.
CDNs can also proxy and cache your API calls if necessary, and they usually respect the Cache-Control headers, allowing you to set different expiration times for each resource. Modern ones can even be configured to ignore specific query parameters or cache based on cookies. Some of them can add custom headers to your requests, such as the original IP address or IP geolocation.
2. Use CSS Animations Instead of JS Animations
Animations are created for a smooth and enjoyable user experience. There are numerous approaches to implementing web animations. In general, we can create animations in three ways: CSS transitions, CSS animations, JavaScript
CSS transitions make it simple to create animations between the current style and an end CSS state, such as a resting button state and a hover state. Even if an element is in the middle of a transition, the new transition begins with the current style rather than the final CSS state. For more information, see Using CSS Transitions.
CSS animations, on the other hand, enable developers to create animations between a set of starting property values and a set of final property values rather than between two states. CSS animations are made up of two parts: a style that describes the CSS animation and a set of key frames that show the start and end states of the animation's style, as well as possible intermediate points.
References and Related Articles: CSS and JavaScript animation performance, CSS Versus JavaScript Animations, Optimize JavaScript Execution
3. Move from CSS-in-JS
By keeping everything in one place, CSS-in-JS provides an excellent developer experience. However, most libraries will place all of your CSS within the page's style tag. That works fine in the browser. When using server-side rendering, however, you will get massive HTML page and pay in performance for its rendering. You will only receive the CSS you require, but it will not be cacheable, and the code to generate it will be included in the JavaScript bundle.
There are zero-runtime CSS-in-JS libraries available, such as linaria, that allow you to write your styles in JS files and have them extracted to CSS files during the build. Under the hood, it even supports dynamic styling based on props via CSS variables.
4. SSR
Typical client-side applications require the browser to fetch, parse, and execute all JavaScript that generates the document that users see. It takes some time, especially if your device is slow.
Server-side rendering provides a much better user experience because their browser will retrieve and display the entire document before loading, processing, and executing your JavaScript code. It does not slowly render DOM on the client, but rather hydrates the state. Yes, the application will not be interactive right away, but it feels much faster. After the initial load, it will behave exactly like a regular client-side app, which means we're not going back to the days of server-side code that wastes server resources on rendering that can be done on the client.
It employs the React-Hydration concept (available in Gatsby or Next.js), which provides a feature in which static HTML is generated using React DOM and then the content is enhanced using client-side JS via React Hydration.
It significantly reduces the FCP (First Contentful Paint) and LCP (Largest Content Paint), which are two of the main criteria of PageSpeed's total score.
Server-side rendering is still relatively slow and consumes some resources. Gatsby solves this problem by pre-rendering the entire website into static HTML pages. However, it is not the best approach for highly dynamic websites and web apps that rely heavily on user input to render content.
5. Optimizing NPM Dependencies
When considering how to reduce the size of your application bundle, consider how much code you are actually using from dependencies. A lot of projects still use Moment.js, which includes localized files for multi-language support. If you don't need to support multiple languages, you can remove unused locales from your final bundle using the moment-locales-webpack-plugin.
Loadash is another example. If you only use 2 of the hundreds methods, having all of the extra methods in your final bundle isn't necessary.
To know the size of the import right away in the editor, use the Import Cost VS code extensions.
It is preferable to use libraries and components that perform the same function but with a smaller bundle size. Some libraries offer hundreds of variations that provide the same feature for your web applications.
6. Analyzing and Optimizing Your Webpack Bundle Bloat
Before deploying to production, you should inspect and analyze your application bundle to remove any unnecessary plugins or modules.
For optimizations, use the `webpack-bundle-analyzer library, which displays the size of webpack output files in an interactive zoomable treemap. It creates an interactive treemap visualization of all bundled content, allowing you to see modules inside and which of them take up the most space. Modern bundlers support quite sophisticated tree shaking that detects unreachable code and automatically removes it from the bundle, but still look out for that.
This module will assist you in the following ways:
- Discover what's really inside your package.
- Determine which modules consume the most space.
- Find modules that ended up there by accident.
- Optimize it!
Also dont forget to use Webpack in production mode.
module.exports = {
      mode: 'production'
    };
Further reading: Optimization - webpack, Application performance optimization using Webpack
X. Other considerations
If You still want optimize your app until heat death of the universe here is some other stuff you should consider:
- Set the Cache-Control Headers: The Cache-Control HTTP header field holds directives (instructions) — in both requests and responses — that control caching in browsers and shared caches. It helps the browser on how to cache the resources and avoid multiple requests to the server. It doesn't reduce the first load time but drastically reduces the subsequent load times for the webpage.
Optimize SVG: They are scalable and looks good in any dimensions with a file size less than as compared to the same raster images (e.g, JPEG, PNG, etc.). However, some SVGs may contain lots of junk which is not used for rendering but are still downloaded eventually increasing the LoadTime. Best practice is to use img tags to render SVGs but you lose the ability to style or animate them. If animation and styling is a critical case then you can use it directly.
Use WebP: WebP is a new image format proposed by Google to reduce the file size with minimal quality loss. It supports both lossy, like JPEG, and lossless, like PNG, compression, and lets you save a lot of bandwidth while making your users and Google happy with faster load times. Typically, pictures are 25-35% smaller in WebP compared to the same quality in JPEG. It even supports animations like GIFs.
- Self-Host Your Fonts: When self-hosting the fonts, the browser would find @font-face directly in the application’s CSS and would only have to download the font files using the same connection to your server or CDN. It’s much quicker and eliminates one fetch.
That's all she wrote!
React applications can quickly grow in size, causing performance issues and crashes. Fortunately for your users You have now learned various methods for improving the performance of React applications. By following these steps, you can significantly improve the speed of your apps and provide the best user experience.
I hope you enjoy and happy coding! 🥑💖